Thursday, August 9, 2012

Craft: Pottery Whales


Craft #6

Hey everybody! Sorry for the wait. 
So for my craft today I have some of the most adorable little smudgie muffins you will ever see. I mean really, just look at their squidgy wittle faces! Have you ever ever ever seen a fuzzymudgecake as coodgely as these bumbledumplings?! They're just so wublydubly and-um....

Let's just forget you ever heard that...

Anyway... So yeah.

Pottery whales. 
They're kinda cute and stuff.


They're made entirely of clay, glazed with an opaque kind of glaze called sapphire (I think), and they took FOREVER and a day to make! The process included several near-heart-attack-inducing slip ups, including breaking one of the fins off while working on the other one, and splashing red glaze on the tail of the littler one. Of course, I just had to stress over the details for a week or so while we waited for the drying and firing, but in the end they turned out cute as buttons and not a trace of red on them!

And the best part? 
This.


GRAND CHAMPION
sajdaljfkljaslfjlaf too excited to form coherent words anymore so
 k bye

~Heather

Tuesday, August 7, 2012

mindfulness.


Be happy in the moment, that's enough. Each moment is all we need, not more. 
-Mother Teresa


Original from For Love of You

Saturday, August 4, 2012

Craft: T.A.R.D.I.S.


Craft #5

So.
 There's this show. 
It's British.
It's science fiction.
It's about a 906 year old alien who has two hearts, thirteen lives and travels time and space in a blue phone booth from the 1950's. 
He calls himself the Doctor.
And he is awesome. 


Not to mention that the Doctor Who 50th Anniversary is coming up! (See above video for related awesomeness)
Unfortunately, the next season of Doctor Who is not scheduled to air until this Autumn, and after that God knows when it will hit the U.S.of A.
So to bide the time until then, I made a T.A.R.D.I.S.


(That's "Time And Relative Dimensions In Space" for newbies and non-Whovians.)


Cool like bowties.
:)


This beauty is crafted entirely from wood, with a lift-off cookie jar style top and foam padding on the bottom of inside. I owe a huge thanks to my dad and his power tools! The outside is hand painted. The windows, light on the roof, and the letters of "POLICE BOX" are coated in invisible day glow paint.

And, it won a lovely purple ribbon, in case you couldn't tell from the image. Who knows? Maybe I have some colorblind readers? LOL

Final note: This was actually the second T.A.R.D.I.S. I made, the first belongs to my co-author Hunter (KexFett) now.


Merry not-even-close-to-Christmas Hunter!


Now if you'll excuse me I must be off. Worlds to save, homework to conquer, the usual. Until next time! Geronimo!


~Heather


Baked beans anyone?

The Land of Milk & Honey: Garden Produce During Drought: Thanks to this year's drought, we are harvesting some unique crops here at CrossRoads End Acres. Today I would like to share with you several...
________________________________________


Just wanted to share. My mom is hilarious! 


Also I just learned how to use tags on my posts (uber derp) and so far I've tagged all of my projects with the "craft" tag. So if you want to see oodles of my silly crafts, feel free to click the craft tag. 


WARNING: CLICKING THE CRAFT TAG MAY RESULT IN ACUTE "WHAT THE HECK?" SYNDROME, UNCONTROLLABLE URGES TO MAKE SOMETHING SHINY-FUL, DIABEETUS, AND A STRANGE OBSESSION WITH DUCK TAPE. WE AT A.D.D. ARE NOT LIABLE FOR ANY CONTAGIOUS DERPITUDE, BRAIN MUSH, PUKING RAINBOWS, OR OTHER MENTAL OR BODILY HARM YOU MAY EXPERIENCE. CLICK AT YOUR OWN RISK.


Friday, August 3, 2012

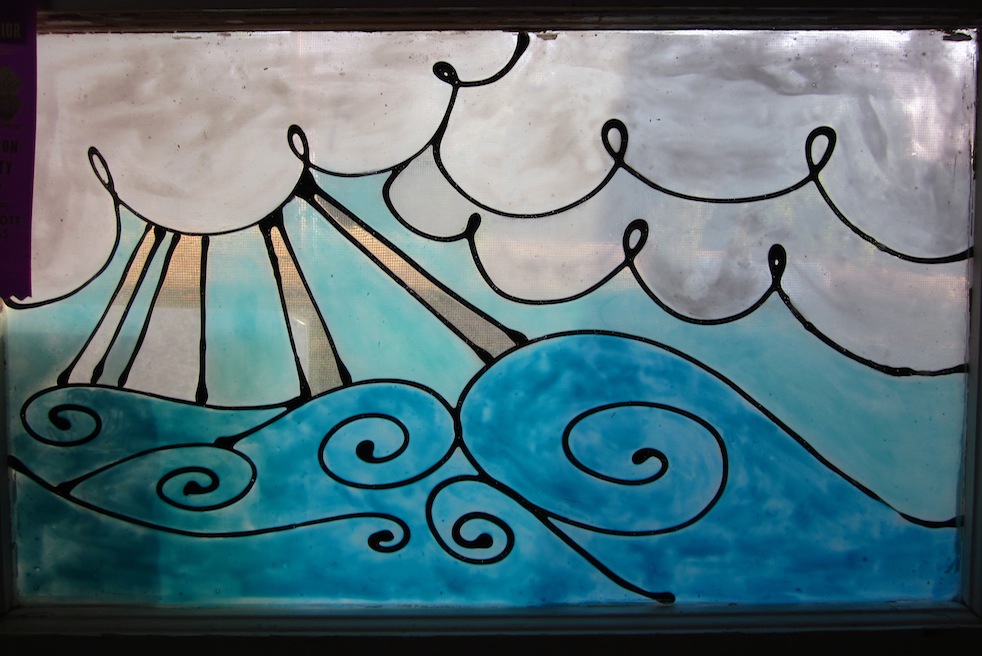
Craft: Faux Stained Glass

Craft #4

Today I've got a shiny winey thing I call 
"faux stained glass".
(creative name, I know. lol)
All you need to make it is Elmer's glue and acrylic paint!


Step One:  Gather your ingredients
  • a sheet of glass 
  • acrylic paints
  • white glue
  • clear glue
  • brushes 
  • something to stir with


For the glass, you could use cheap picture frames from Wal-Mart, or even an old window like I did. Also, firmer brushes work best to keep bubbles from forming. I recommend acrylic brushes if you can find them.

Step Two:  Mix your colors

To make the black lines, you'll need black acrylic paint, and white Elmer's glue. Squirt some of the glue out to make room in the bottle. Then pour the black paint into the glue drop by drop, mixing after each drop until the glue is completely black.Make sure not to leave white on the inside walls of the bottle, it must be mixed thoroughly.

For the colored areas, pick or mix the color of your choice in paint. Fill a small (preferably disposable) container with glue, then drip a drop of paint into it and stir. The average ratio should be a drop of paint to a Tbsp of glue, but I've learned the hard way it's not nearly so simple. In truth, you're probably going to have to go through some trial and error before you find the mixture that's just thick enough. Remember it should be consistent in color, and thin enough to see silhouettes through at least. It's hard to tell while the mixture is in a container, so I highly recommend finding some broken glass or something to test it on.


Step Three: Make lines

You can do this part freehand if you'd like, or you can draw a design on paper and trace it. Either way, you'll need to take the bottle of black glue and use it to "draw" lines on your glass. Beware: It tends to *glob* at the ends. This one could probably use some practice as well. 

Step Four: Apply color

Now's the part where you take your brushes and brush/dab all of your pretty color in between the lines. The color needs to touch the lines. If your color is too strong it may show on top of the black, but if your mix is thin enough it should be more or less invisible. Even so I've found it's easiest to just display the glass from the opposite side. (lol lazy me XD) If your mix turns out to be too thin, feel free to apply several layers. 

And there you go.
Of course mine doesn't look exactly like stained glass, but I wasn't trying too hard for that either. Next time maybe I'll use a reference? I dunno. As usual I dare you all to top me ( which shouldn't be hard) and let me know about it. 

Now go out and make something beautiful!


P.S. This piece has been chosen for the state fair! Wish me luck!

Monday, July 30, 2012

Craft: Make-Your-Own Chalkboard Paint

Craft #3

Homemade chalkboards.
This one is unbelievably simple.
First you find a surface to paint ( I used wood scraps left over from one of my dad's projects), then you mix some simple ingredients in a disposable container.

1 Tbsp unsanded grout
1/2 C  acrylic or latex paint 

Brush the mixture evenly over your chosen surface, let it dry, and TADAAA!
A wild chalkboard appears!


And if you want to dress them up, you can do what I did and brush another color on the sides. They would look fine either way, but I thought the green made them seem more complete.

So there you go, another simple, low cost craft for you! Just remember to use a disposable container to mix it in, and to rinse your brush immediately after you finish. The grout makes this combination dry incredibly fast, and once it's dry there's no removing it. (Or at least no way I know of, though I haven't tried very hard. ) 

Of course, wood scraps aren't the only things you can paint. (Well, DUH! Silly Heather, feeling like to have to mention the obvious. tsk tsk.) Anyway, my brain is too lazy to come up with more creative applications for the paint, but I'm sure my incredible readers will go on and make something brilliant with it! If you do, please link it back here and let me know!

That's all for now then. Until tomorrow ~ <3

~Heather

Sunday, July 29, 2012

Craft: Rainbow Dash Shoes

Craft #2

Craft time again! 
This one is specially for my good friend 
DJ Shamrock! 
You may know him from Celestia Radio?
http://ponify.me
shameless plugging FTW

Made these for my little sis on request. Unfortunately I didn't get my picture until after she'd worn them, so they aren't quite as sparkly as they were...
But here they are anyway.


And a blue ribbon W000000!!!